Jira Integration User Guide
Testworthy provides comprehensive bidirectional integration with Jira, enabling seamless workflow between your test management and issue tracking systems. This guide covers both outbound connections (Testworthy → Jira) and inbound connections (Jira → Testworthy).
Overview
Testworthy's Jira integration consists of two main components:
- Connect to Jira: Configure how Testworthy connects to your Jira instance to create issues, link test cases, and sync statuses
- Jira Plugin Access: Manage API access for Jira marketplace plugins to access Testworthy data
Integration Features
From Testworthy to Jira:
- Create Jira issues directly from test cases
- Link test cases to existing Jira issues
- Auto-create defects when tests fail
- Sync test case status with Jira issue status
- Attach test results to Jira issues
- Real-time status updates
From Jira to Testworthy:
- View linked test cases in Jira issues
- Access test case details from Jira
- Create new test cases from Jira
- Track testing progress in Jira dashboards
Prerequisites
Before setting up the integration, ensure you have:
-
Jira Instance Access
- Administrative access to your Jira instance (Cloud or Server)
- Ability to create API tokens
- Project permissions in target Jira projects
-
Testworthy Permissions
- Platform Admin, Tenant Owner, or Project Manager role (for global configuration)
- Project access for the projects you want to integrate
-
API Tokens
- Atlassian API token from https://id.atlassian.com/manage-profile/security/api-tokens
Connect to Jira (Testworthy → Jira)
This configuration allows Testworthy to connect to your Jira instance and perform actions like creating issues and linking test cases.
Step 1: Access Integration Settings
- Navigate to the Jira Integration module in Testworthy
- Select the Connect to Jira tab
- Choose your target project from the dropdown
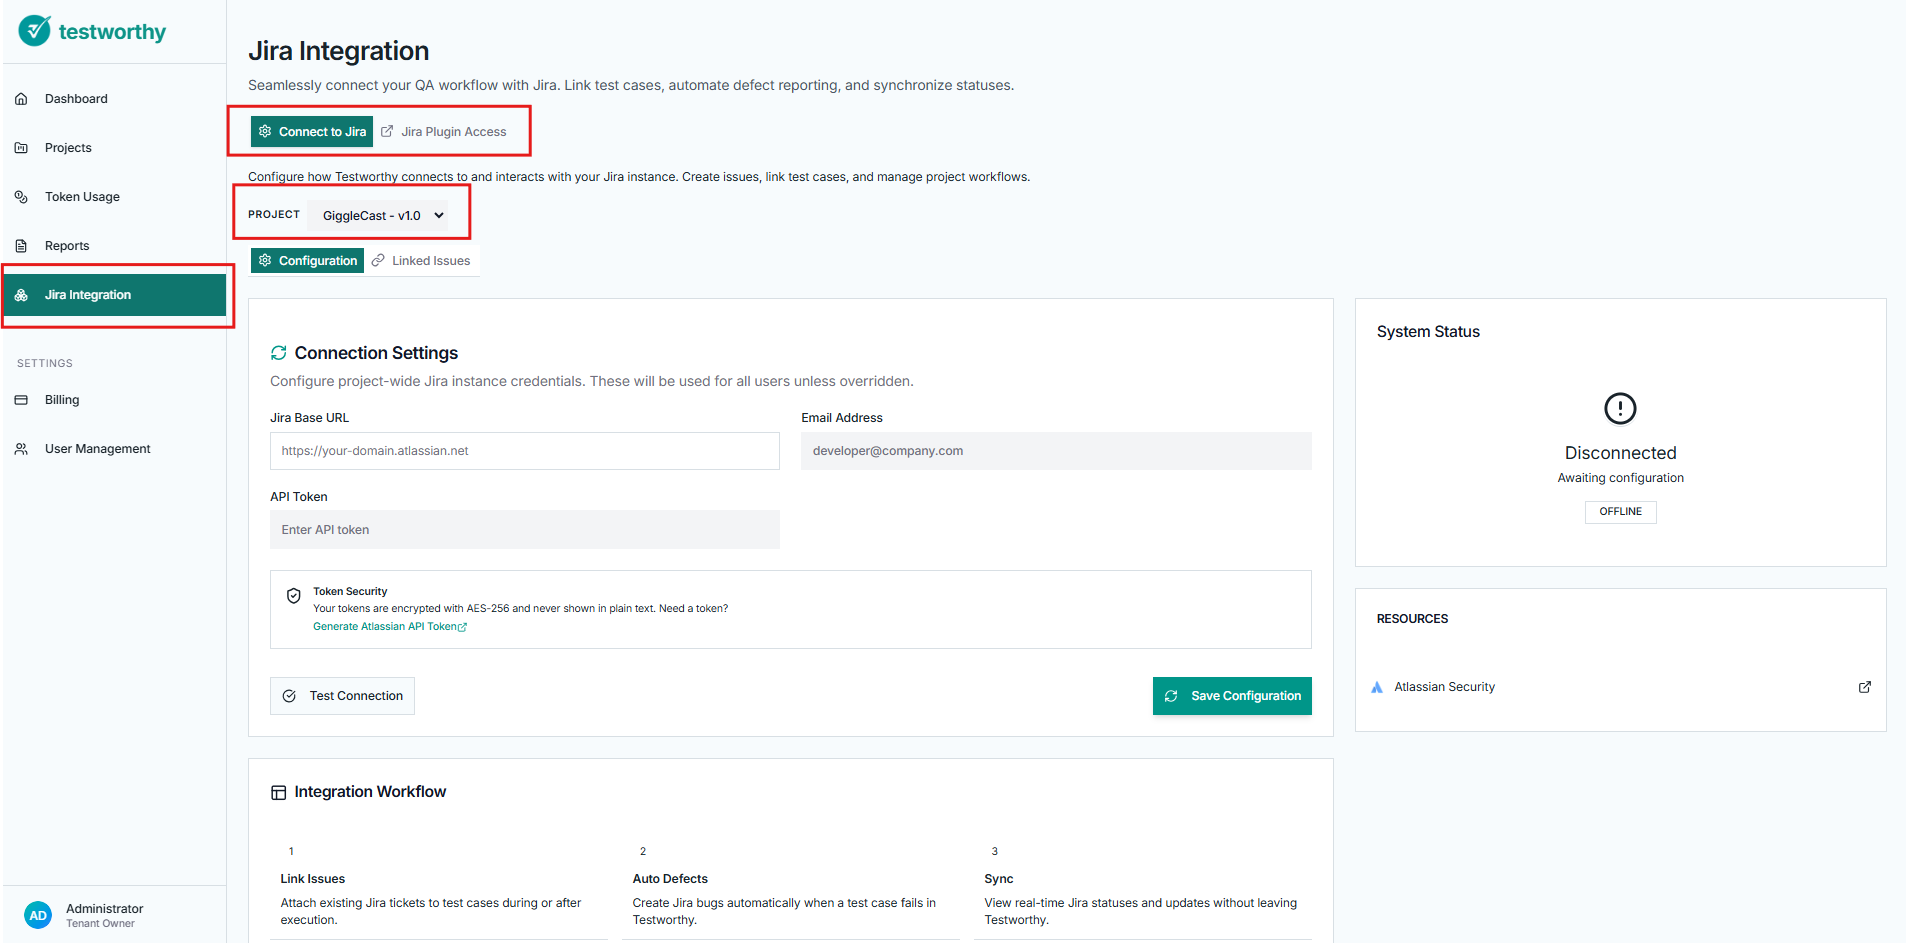
Step 2: Configure Connection Settings
Project-Wide Configuration (Admins Only)
- In the Configuration tab, locate the Connection Settings card
- Fill in the required fields:
- Jira Base URL: Your Jira instance URL (e.g.,
https://your-domain.atlassian.net) - Email Address: The email associated with your Jira account
- API Token: Your Atlassian API token
- Jira Base URL: Your Jira instance URL (e.g.,
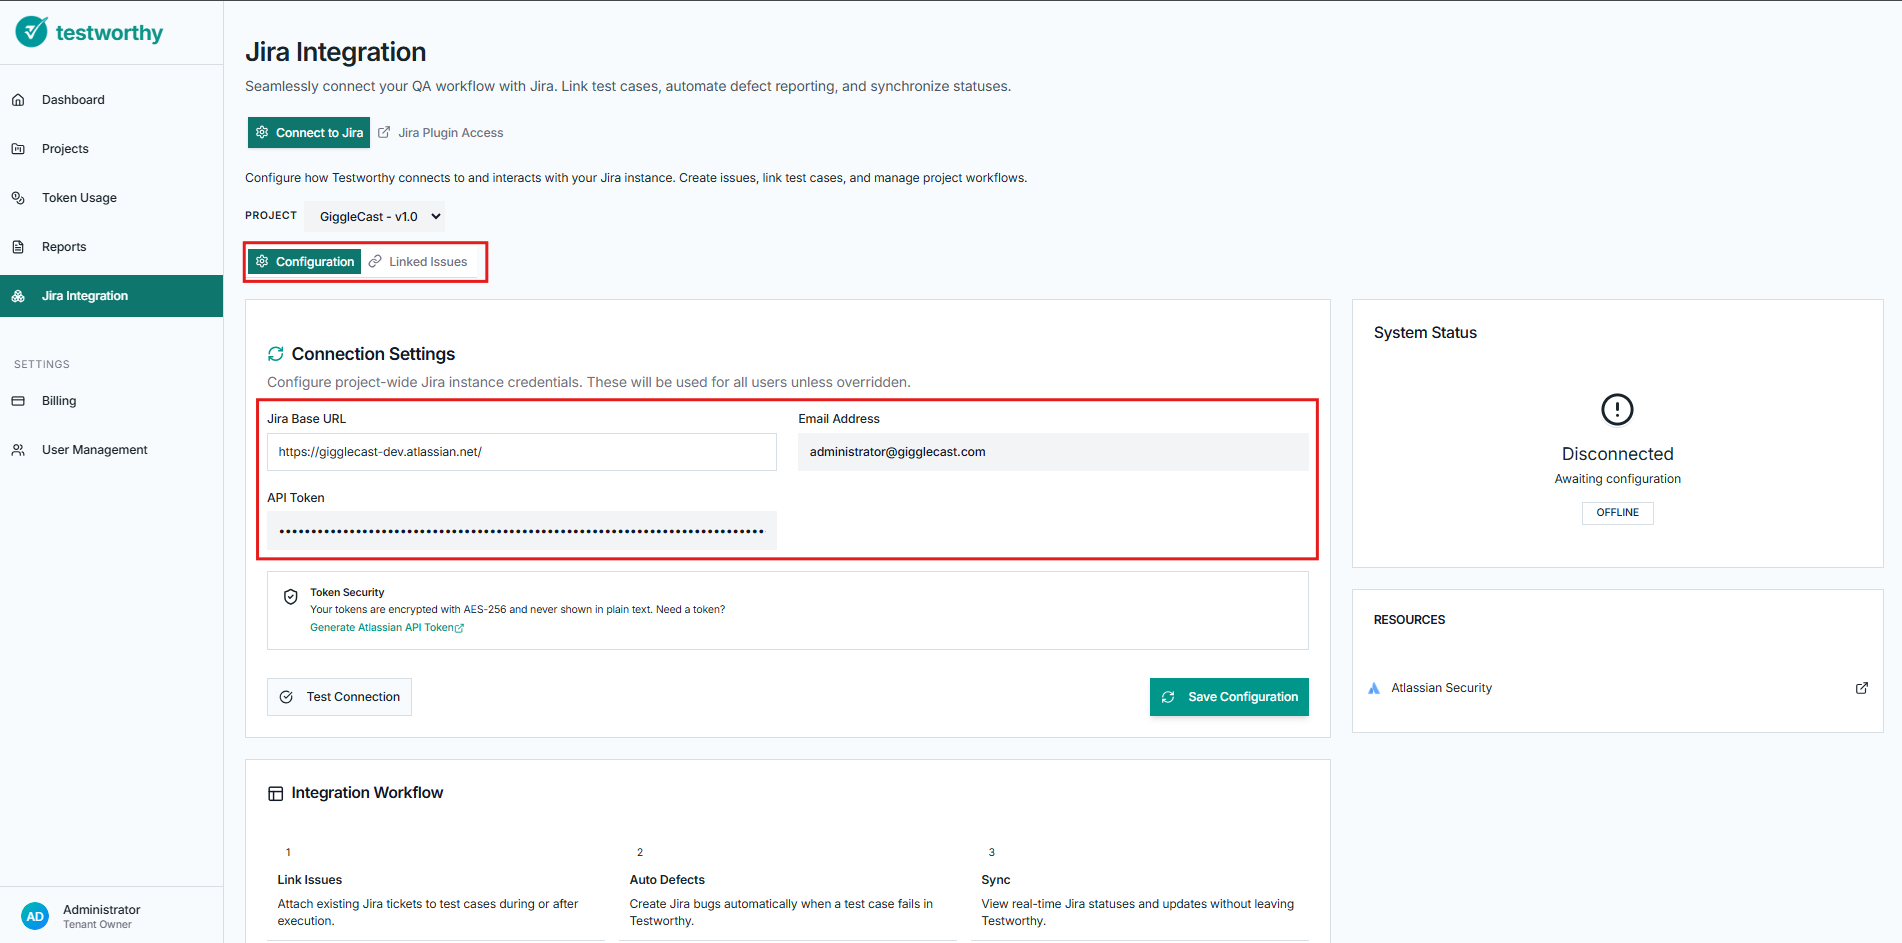
- Click Test Connection to verify the configuration
- Click Save Configuration to apply the settings
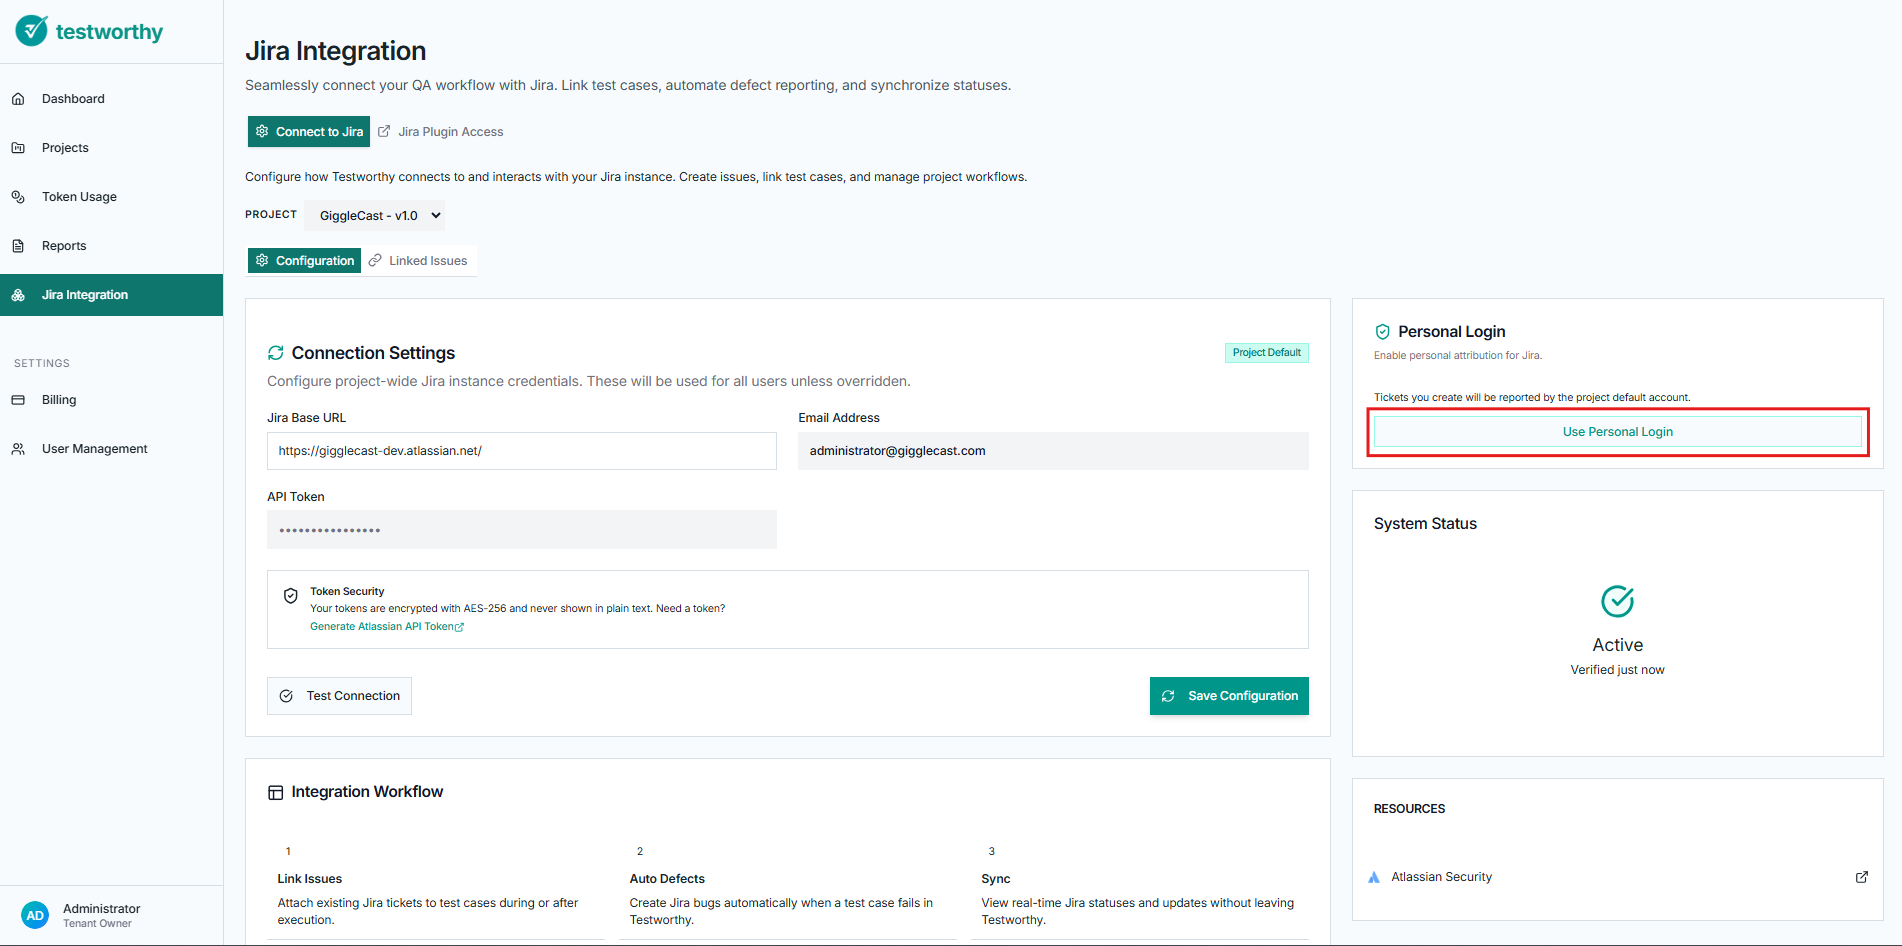
Personal Override Configuration
Individual users can override project settings with their personal credentials:
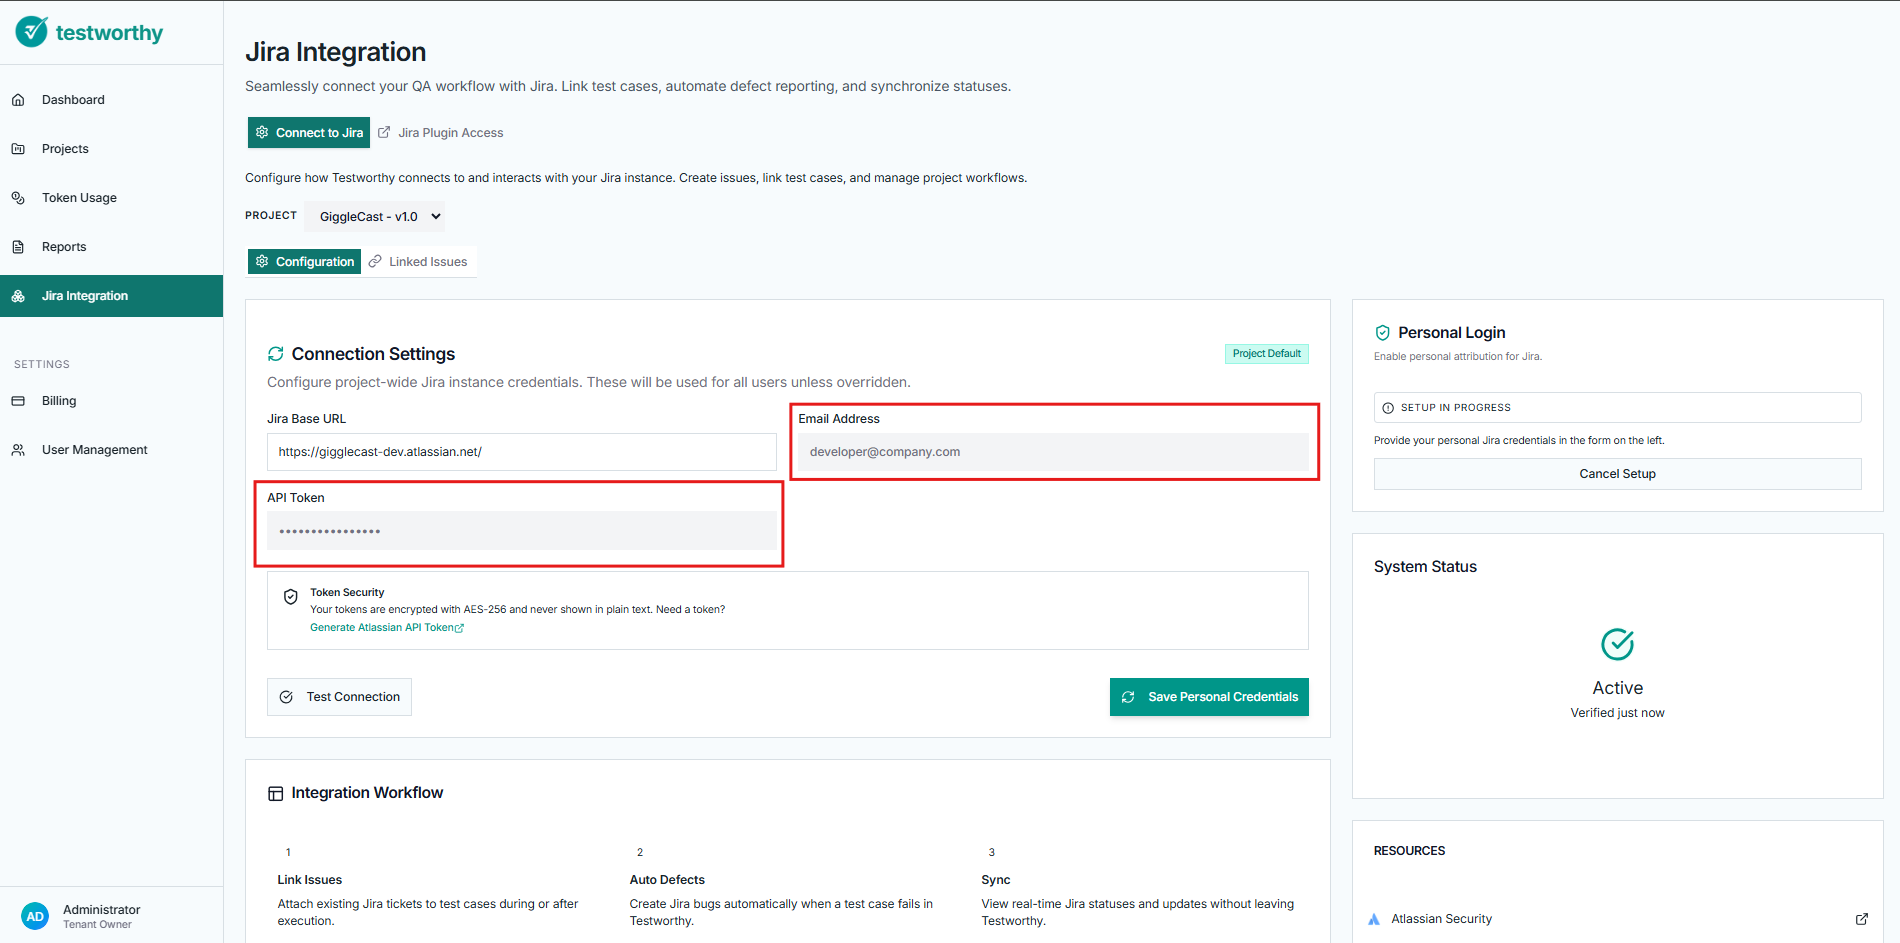
- Click Use Personal Login in the Personal Login card
- Enter your personal email and API token
- Save the personal credentials
Step 3: Understanding the Integration Workflow
The integration follows a three-step process:
- Link Issues: Attach existing Jira tickets to test cases during or after execution
- Auto Defects: Create Jira bugs automatically when a test case fails
- Sync: View real-time Jira statuses and updates without leaving Testworthy
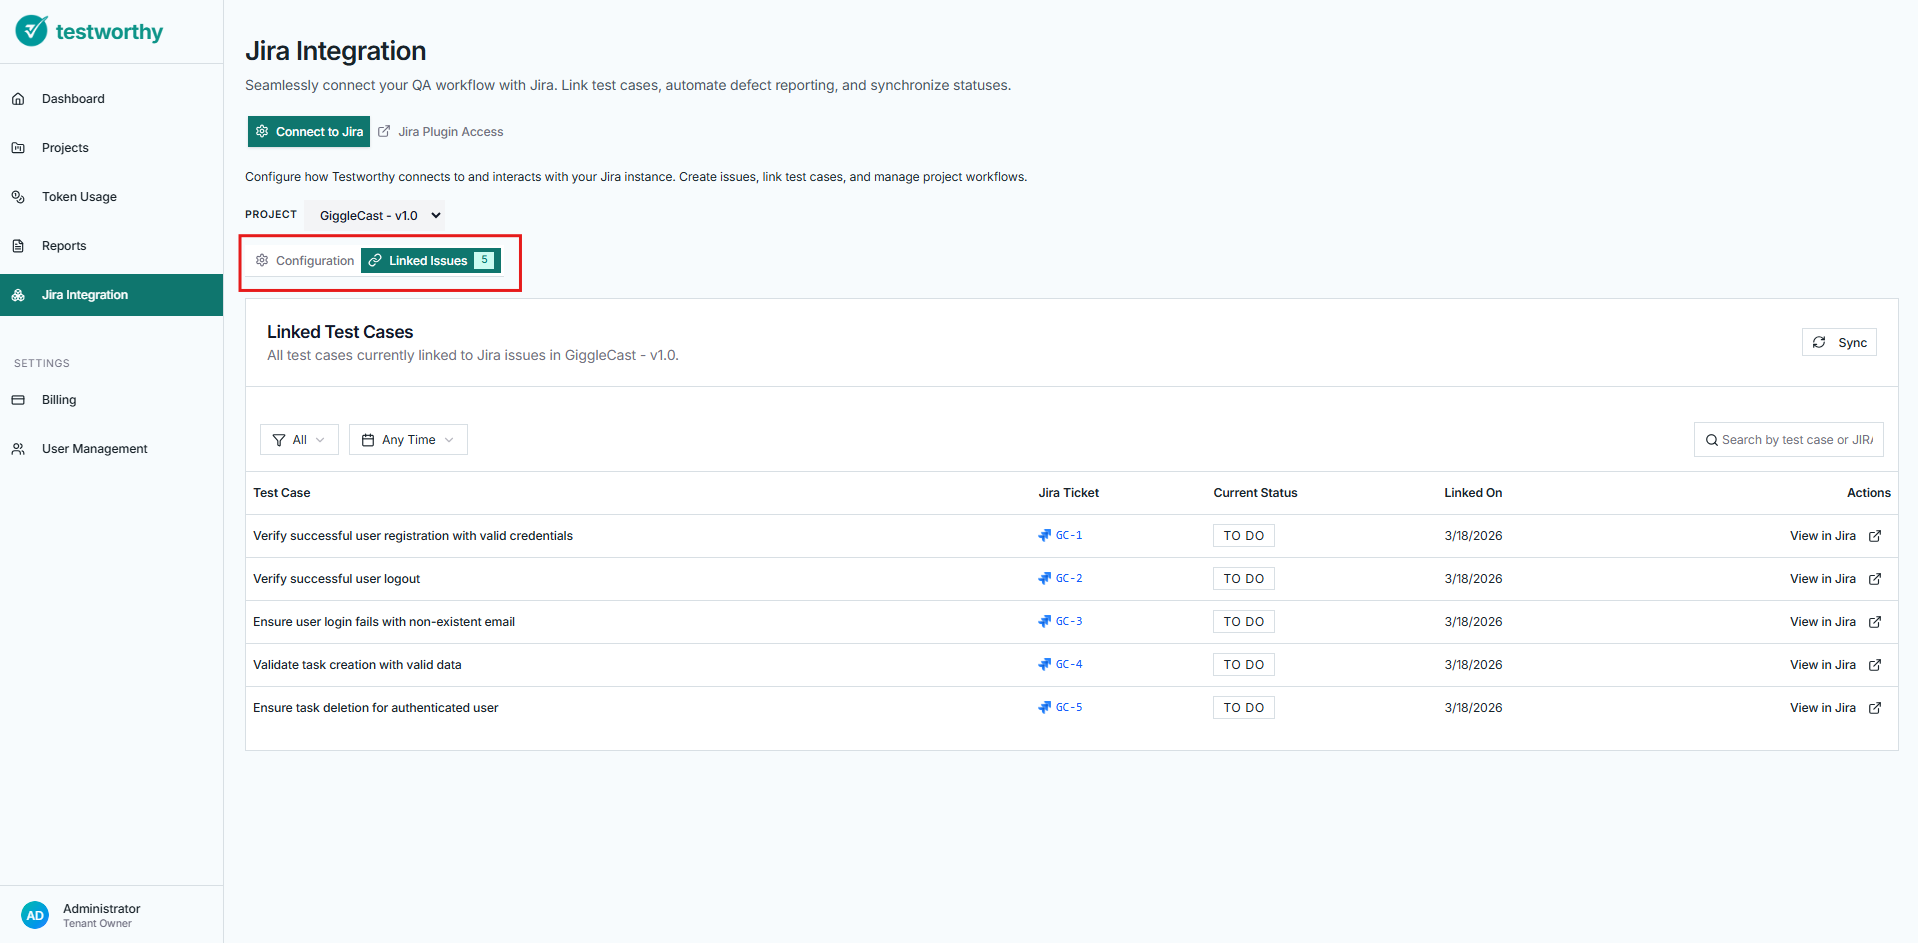
Step 4: Working with Linked Issues
Viewing Linked Issues
- Go to the Linked Issues tab
- View all test cases currently linked to Jira issues
- Use filters to search by:
- Test case name or Jira key
- Issue status (All, Done, In Progress, etc.)
- Date ranges (Today, Last 7 days, Last 30 days)
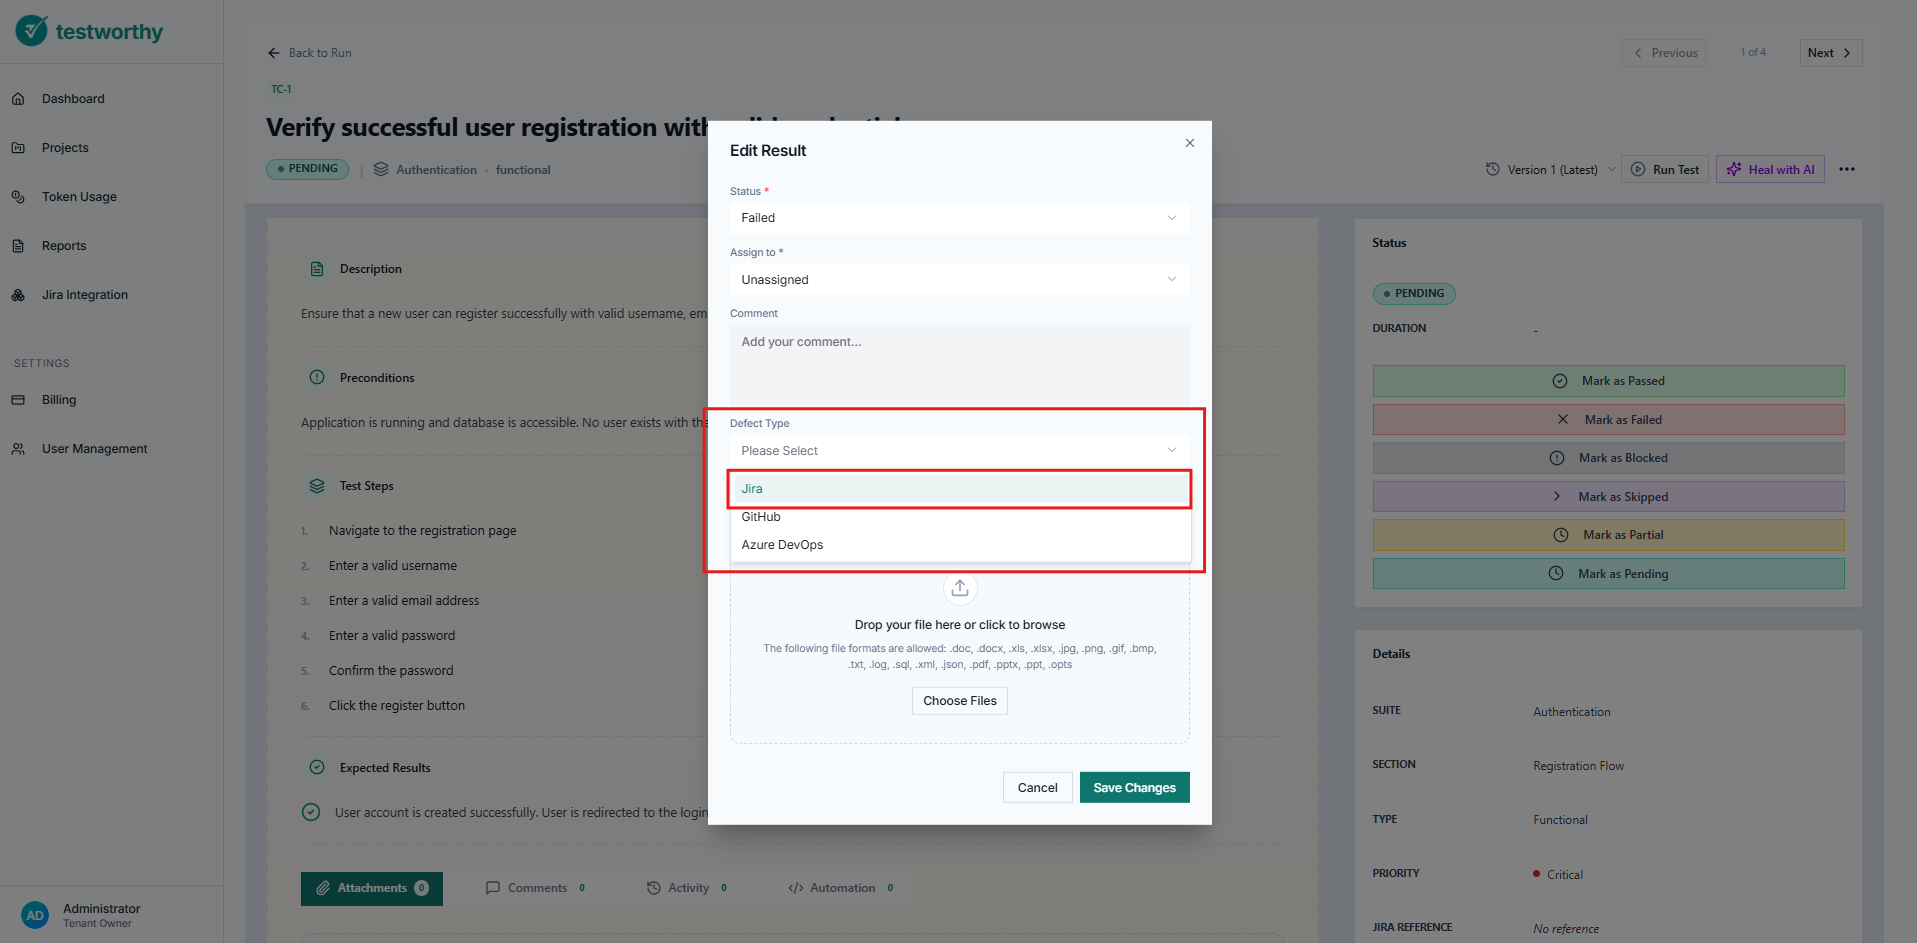
Linking Test Cases to Jira Issues
During test execution:
- Run your test cases in Testworthy
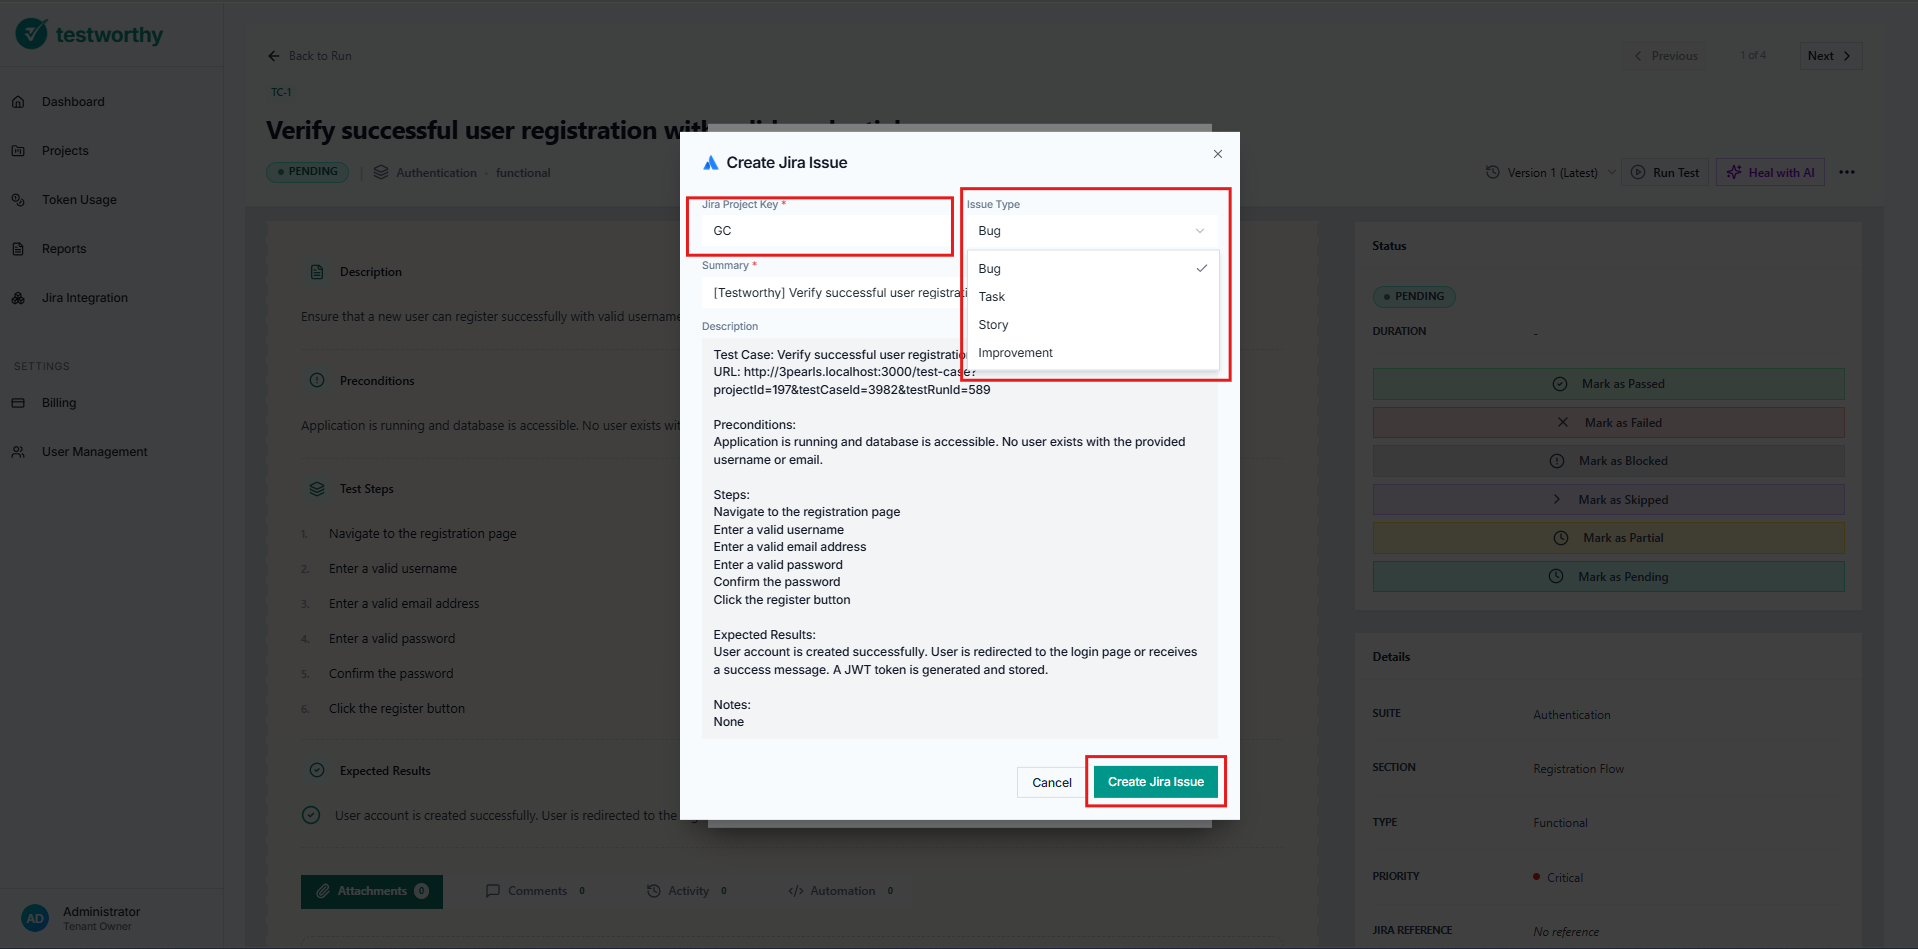
- For failed tests, use the Jira integration option
- Choose to link to an existing issue or create a new defect
- The linkage will appear in the Linked Issues view with real-time status
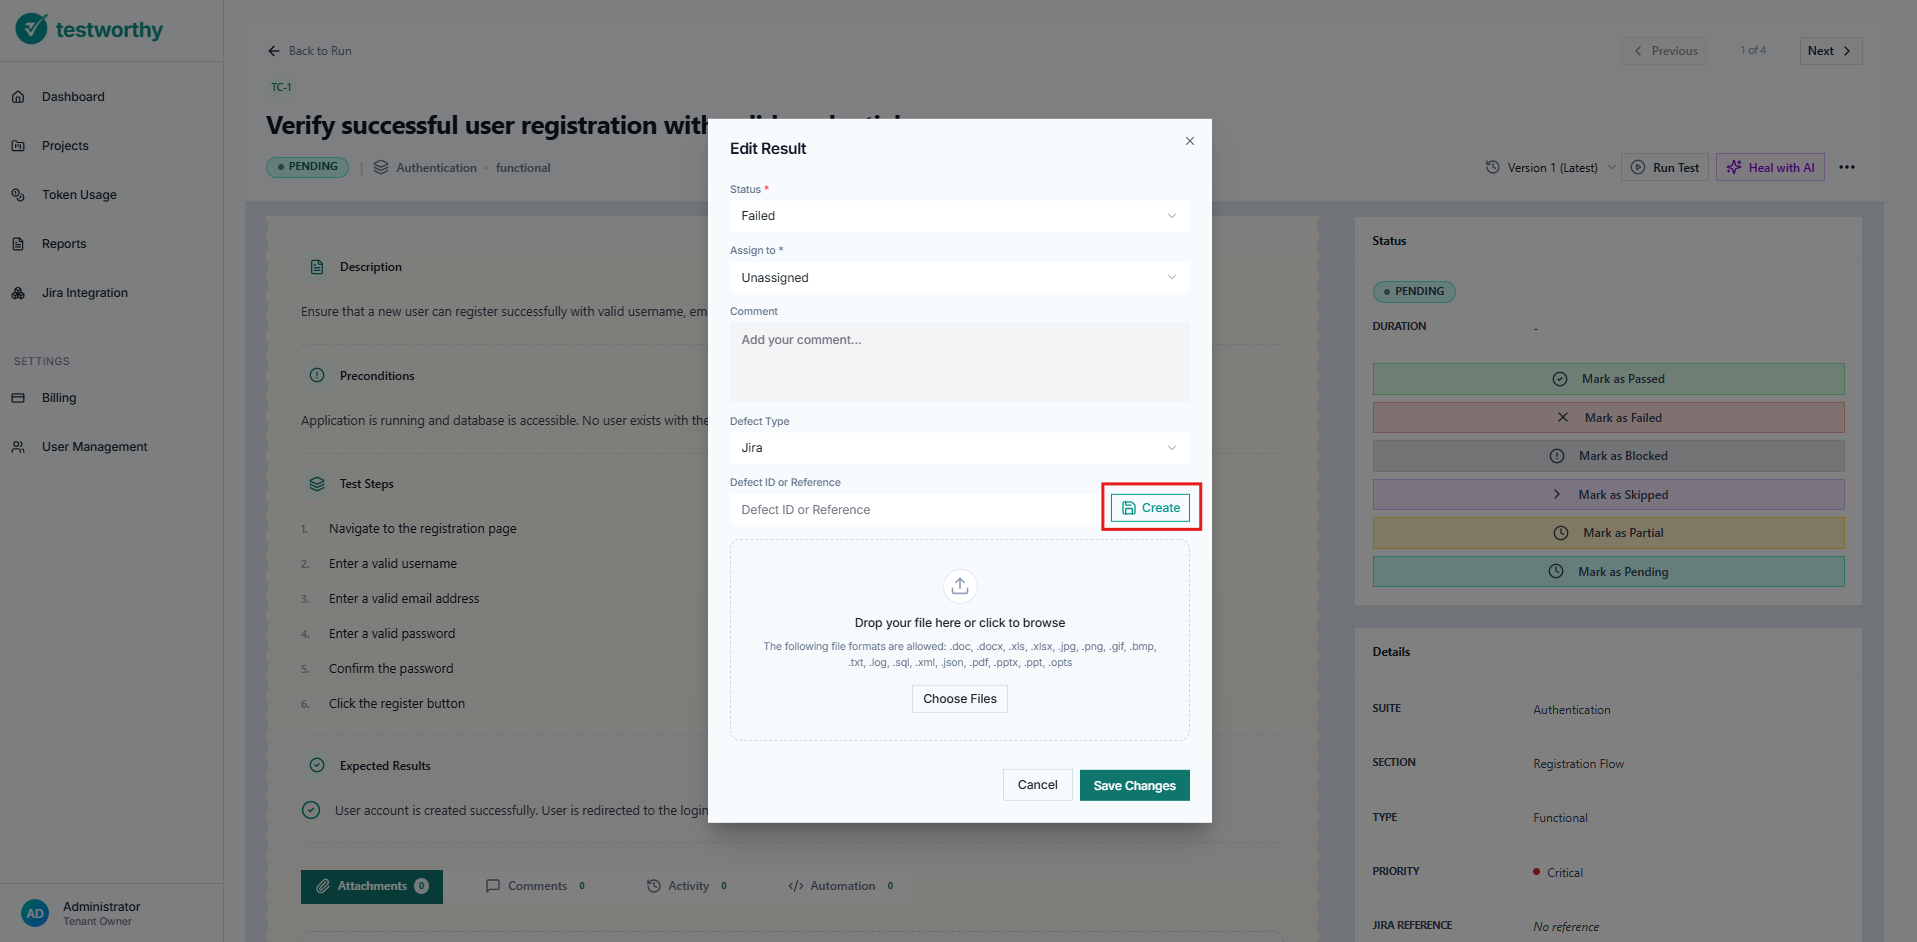
Existing Jira Reference
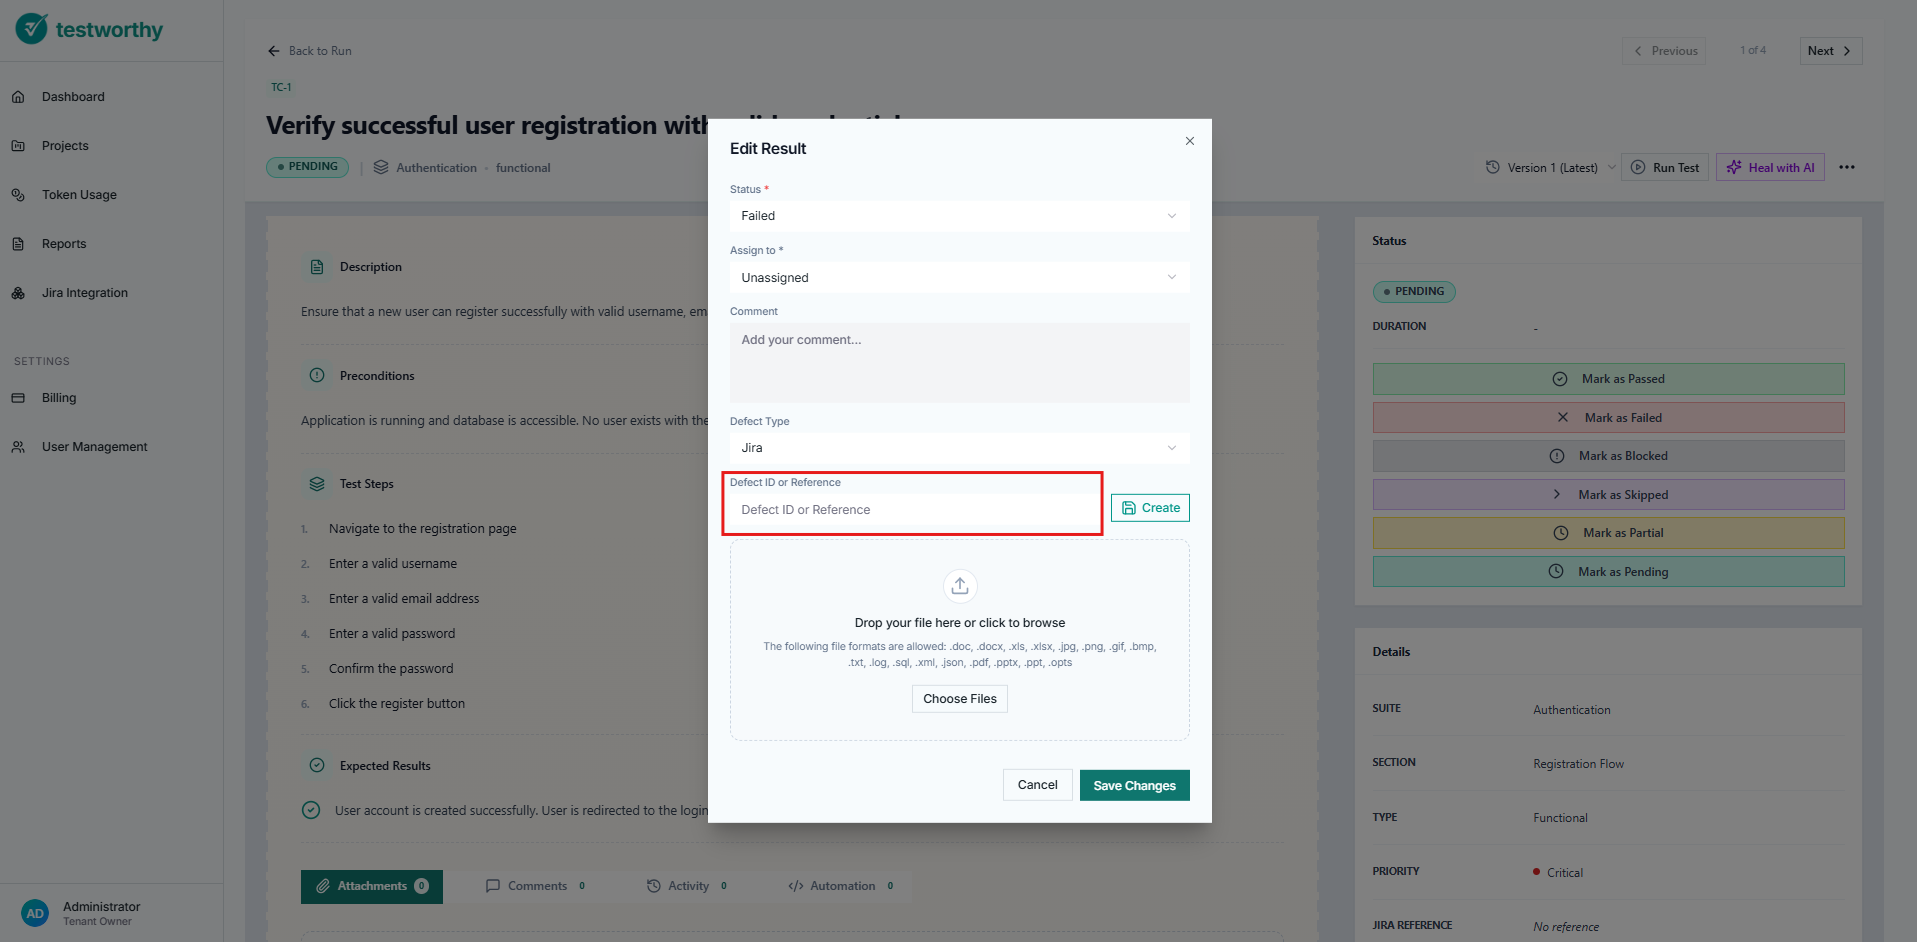
Create new Jira Issue
Managing Linked Issues
- View in Jira: Click the "View in Jira" button to open the issue in your Jira instance
- Status Sync: Statuses are automatically synchronized every 30 seconds
- Real-time Updates: Changes in Jira are reflected in Testworthy within seconds

Jira Plugin Access (Jira → Testworthy)
This configuration enables Jira marketplace plugins to access Testworthy data through secure API keys.
Step 1: Access Jira Plugin Access
- Select the Jira Plugin Access tab in the Jira Integration module
- This opens the Jira Plugin Access Dashboard
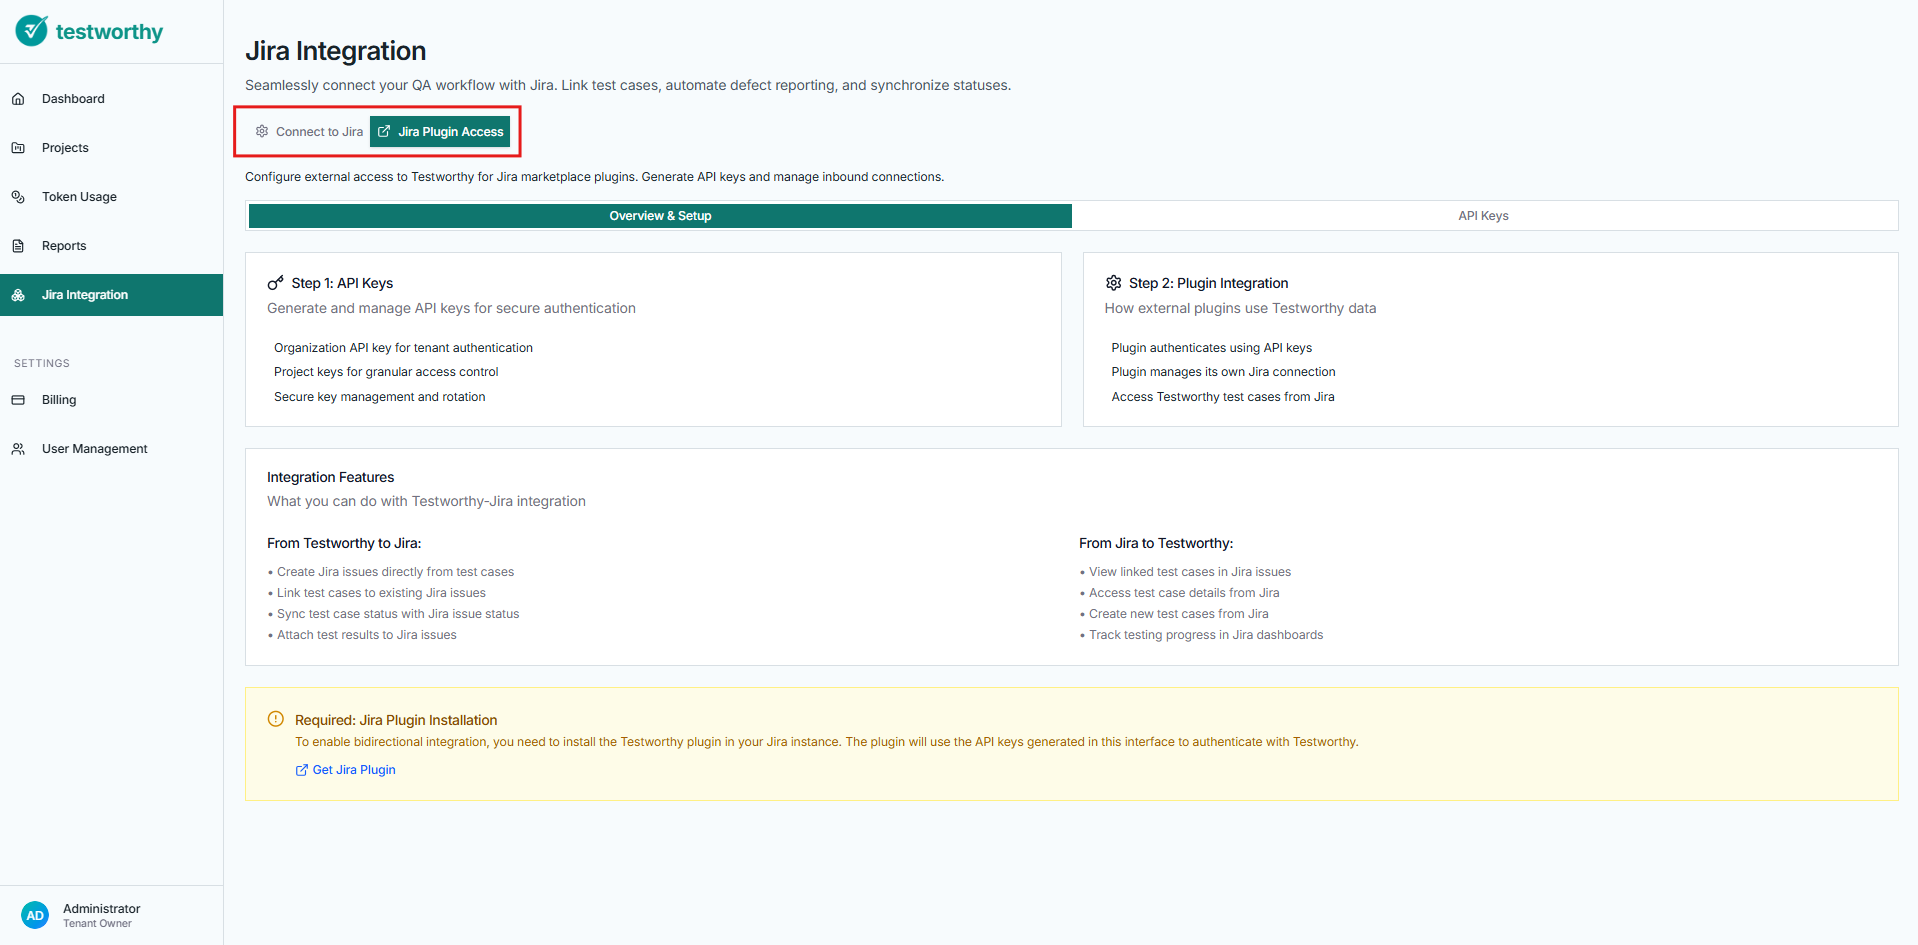
Step 2: Understanding the Setup Process
The Jira plugin access requires two main steps:
- API Keys: Generate and manage API keys for secure authentication
- Plugin Integration: Install and configure the Testworthy plugin in Jira
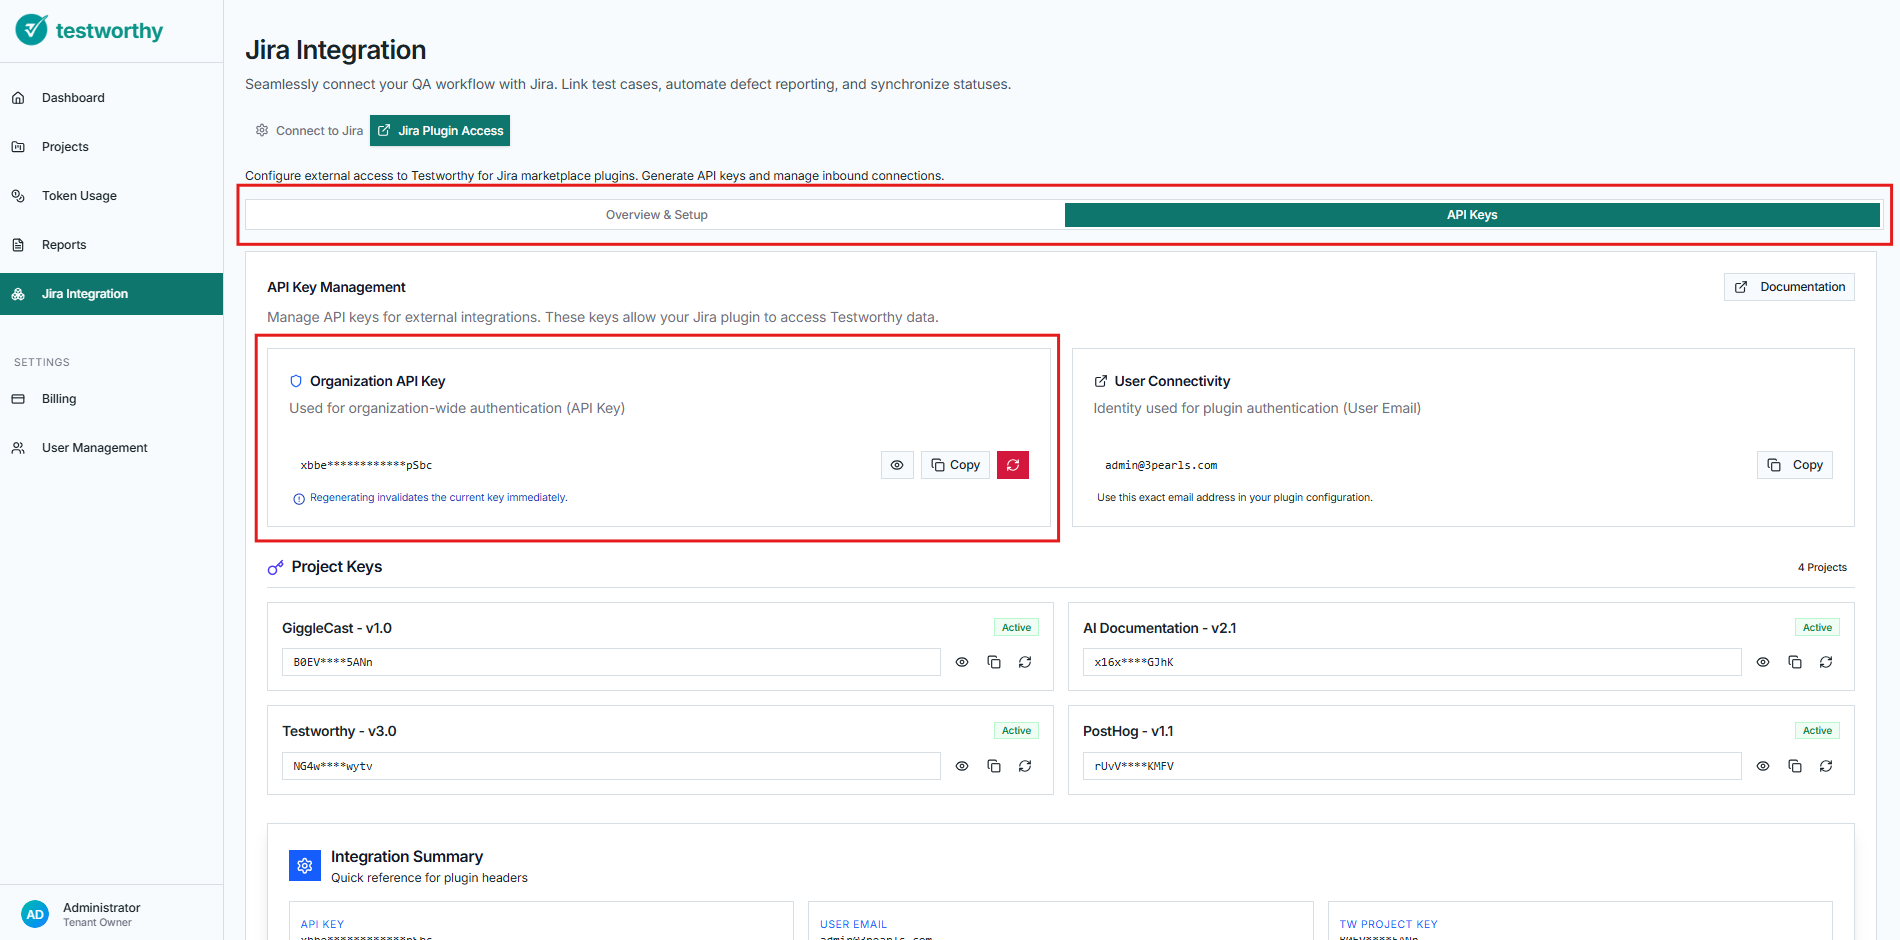
Step 3: API Key Management
Generating Organization API Keys
- Navigate to the API Keys tab
- Generate an Organization API key for tenant-level authentication
- This key provides access to all projects within your organization
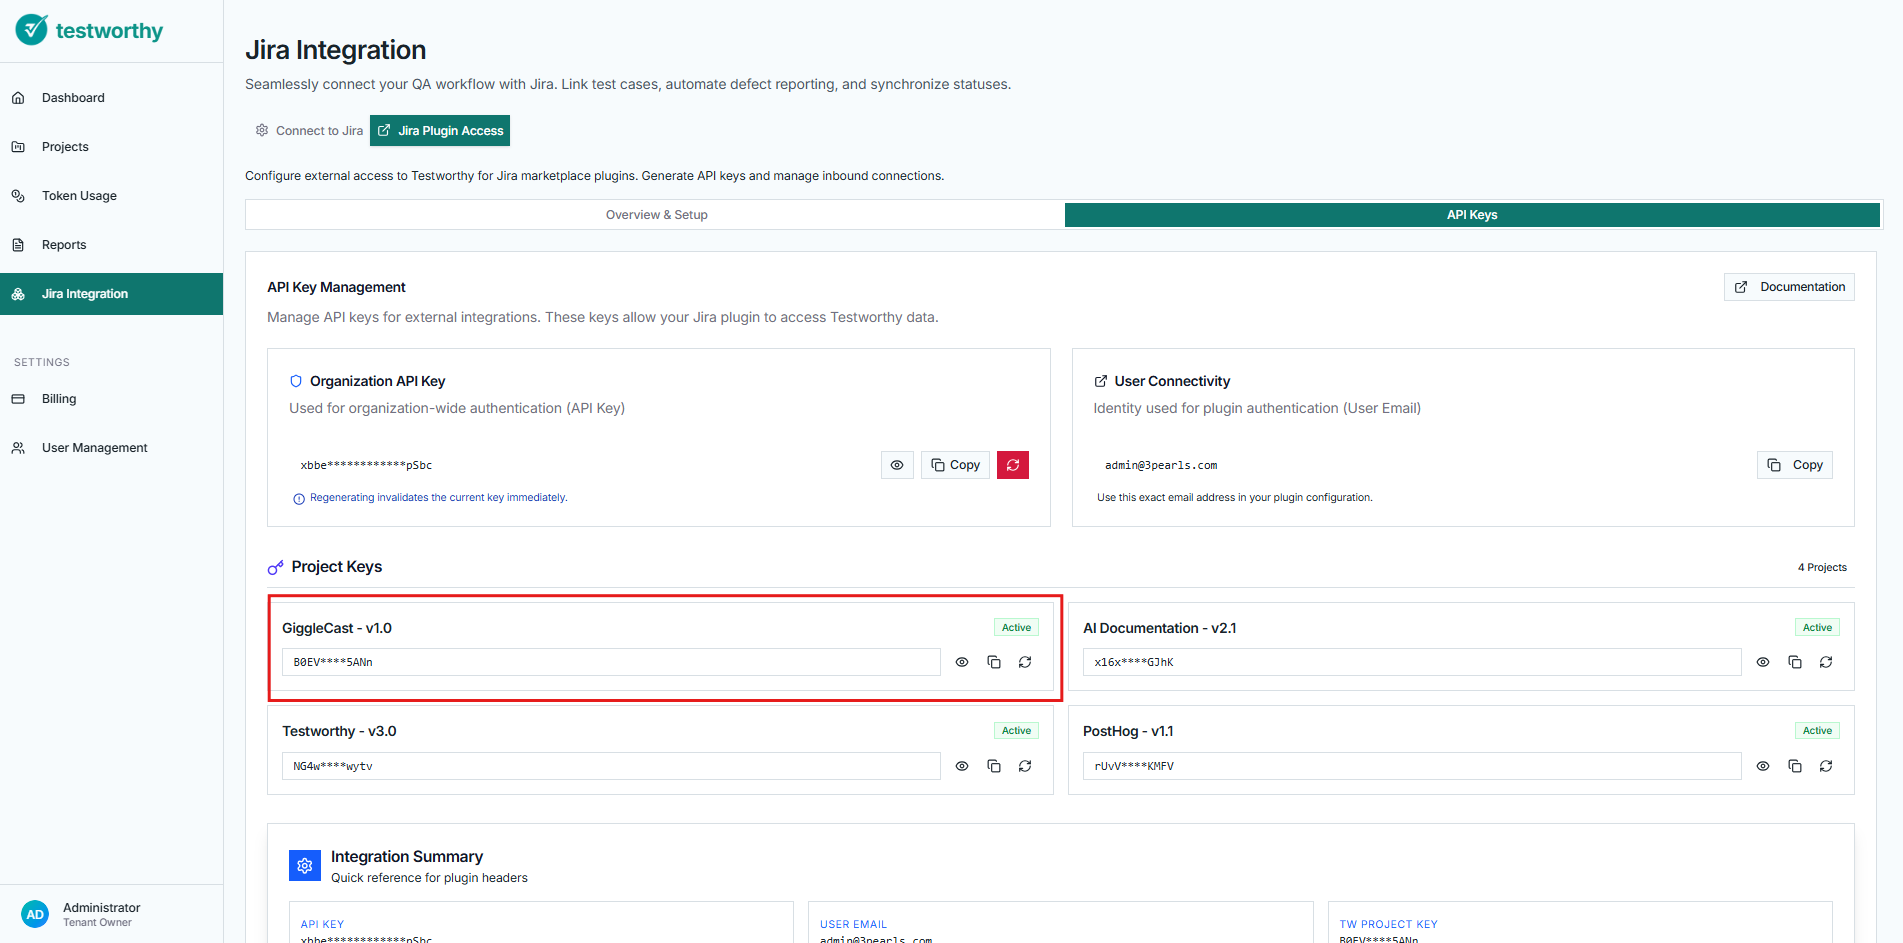
Generating Project-Specific API Keys
- Generate individual API keys for specific projects
- These keys provide granular access control
- Each project can have its own unique API key
Key Management Best Practices
- Secure Storage: Copy and store keys securely immediately after generation
- Key Rotation: Regularly regenerate keys for enhanced security
- Access Control: Use project-specific keys when possible for better security
- Monitoring: Keep track of which keys are being used by which plugins
Step 4: Adding Jira Reference to a Test Case
After configuring the plugin, you can add a Jira Reference to a test case in Testworthy:
- Open the test case you want to link in Testworthy
- Click on the ... button and select Edit
- Enter the Jira issue key (e.g.,
PROJ-123) you want to reference - Save the changes
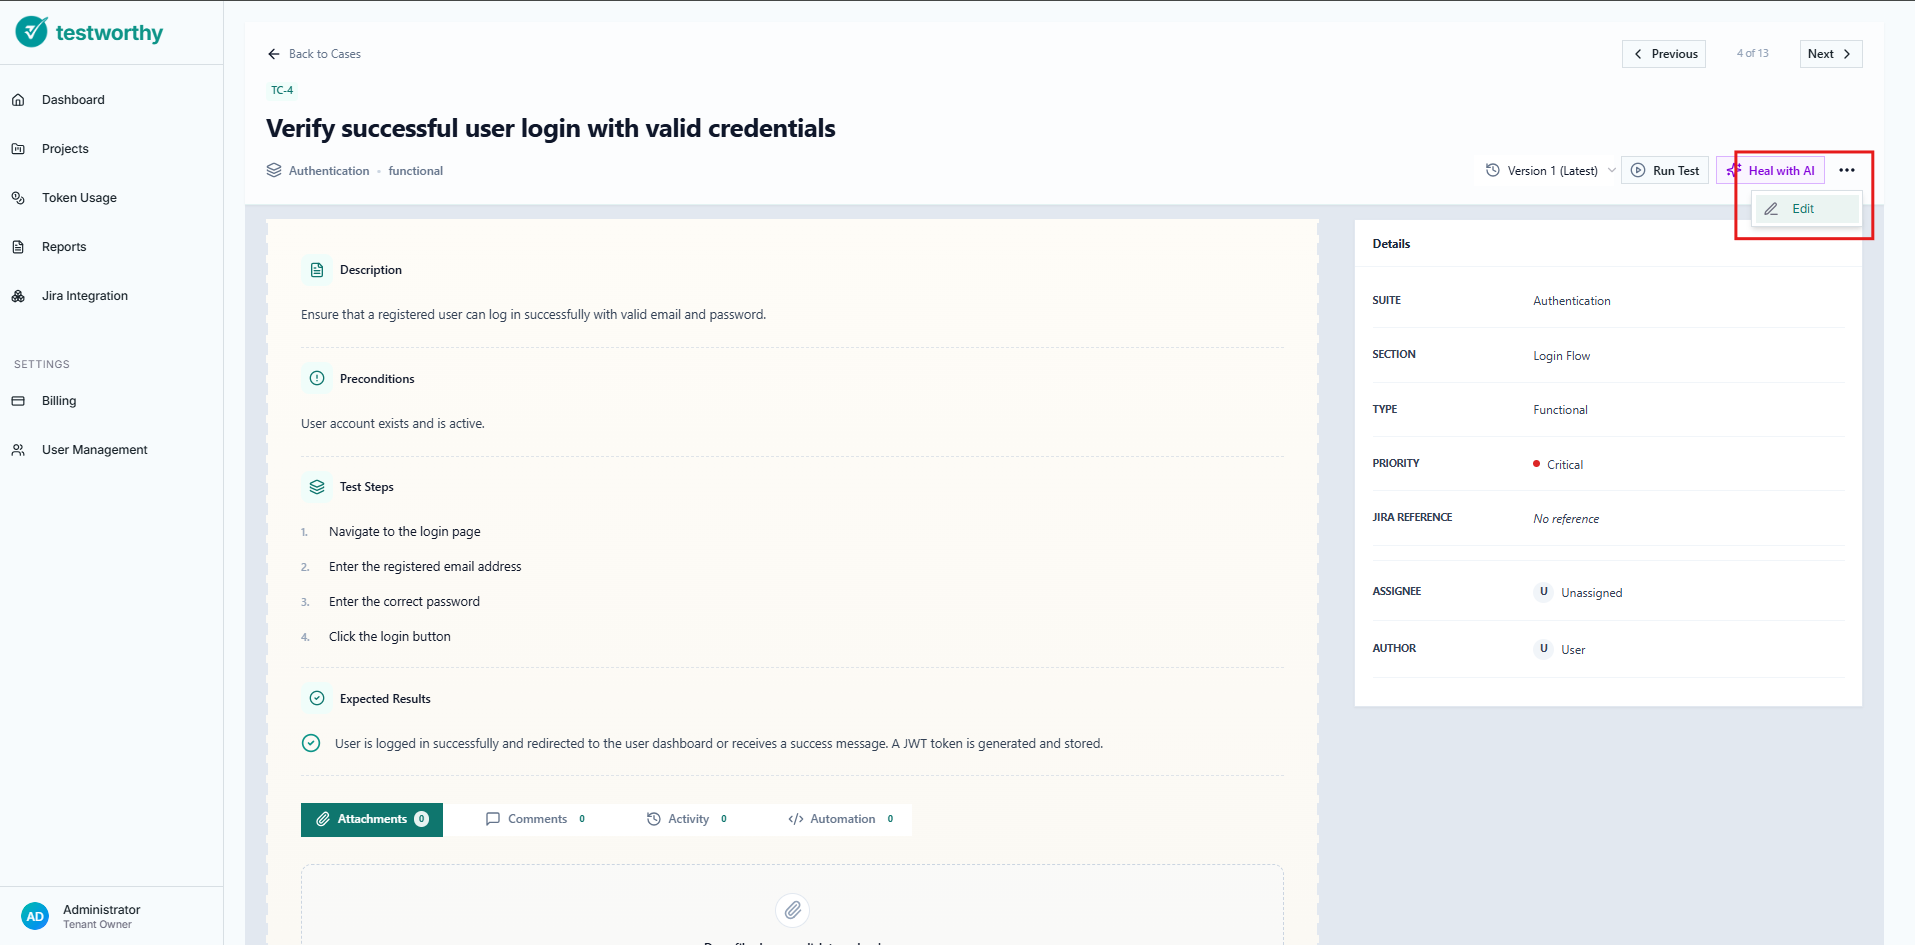
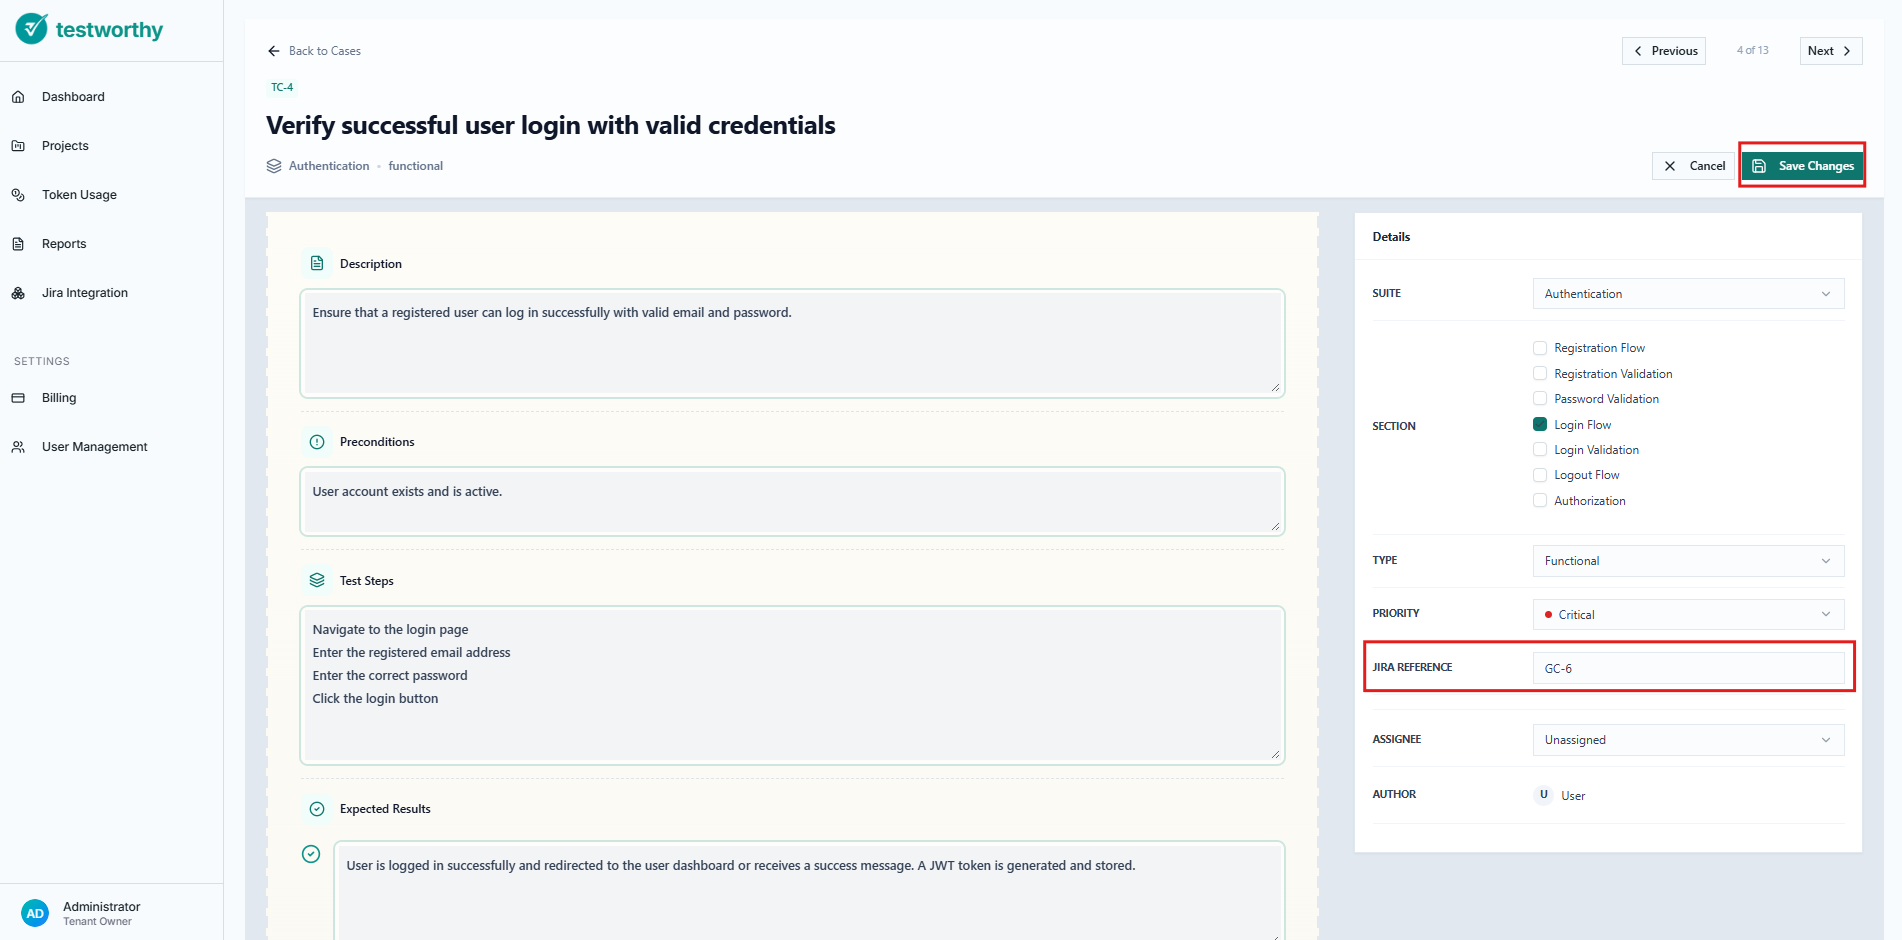
Note: Jira Reference can also be added when manually creating a new test case.
Step 5: Installing the Jira Plugin
- Visit the Atlassian Marketplace
- Install the Testworthy plugin in your Jira instance
- Configure the plugin with the API keys generated in Step 3
- Set up the connection to your Testworthy instance
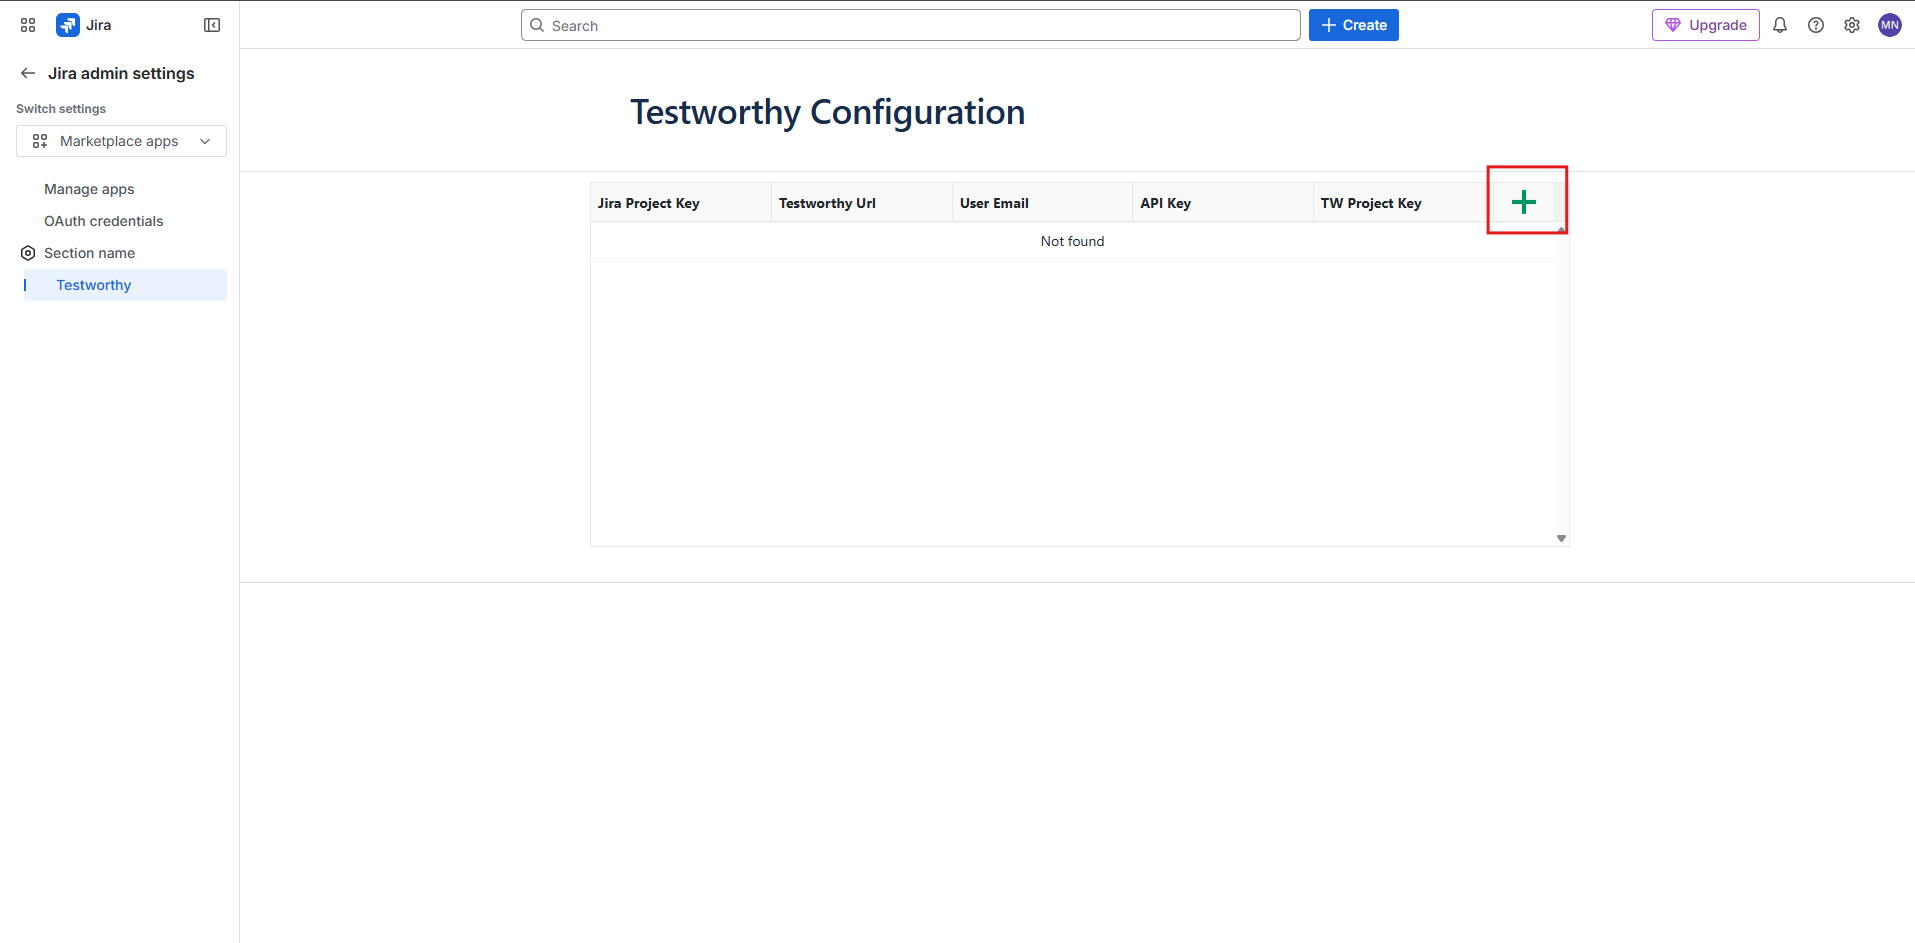
Step 6: Plugin Configuration
Once installed, configure the plugin with:
- Jira Project Key: Exact Jira Project/Space key
- Testworthy URL: https://app.testworthy.us/
- User Email: Exact user email copied from Testworthy
- API Key: The organization-specific API key
- TW Project Key: The project-specific API key generated from Testworthy
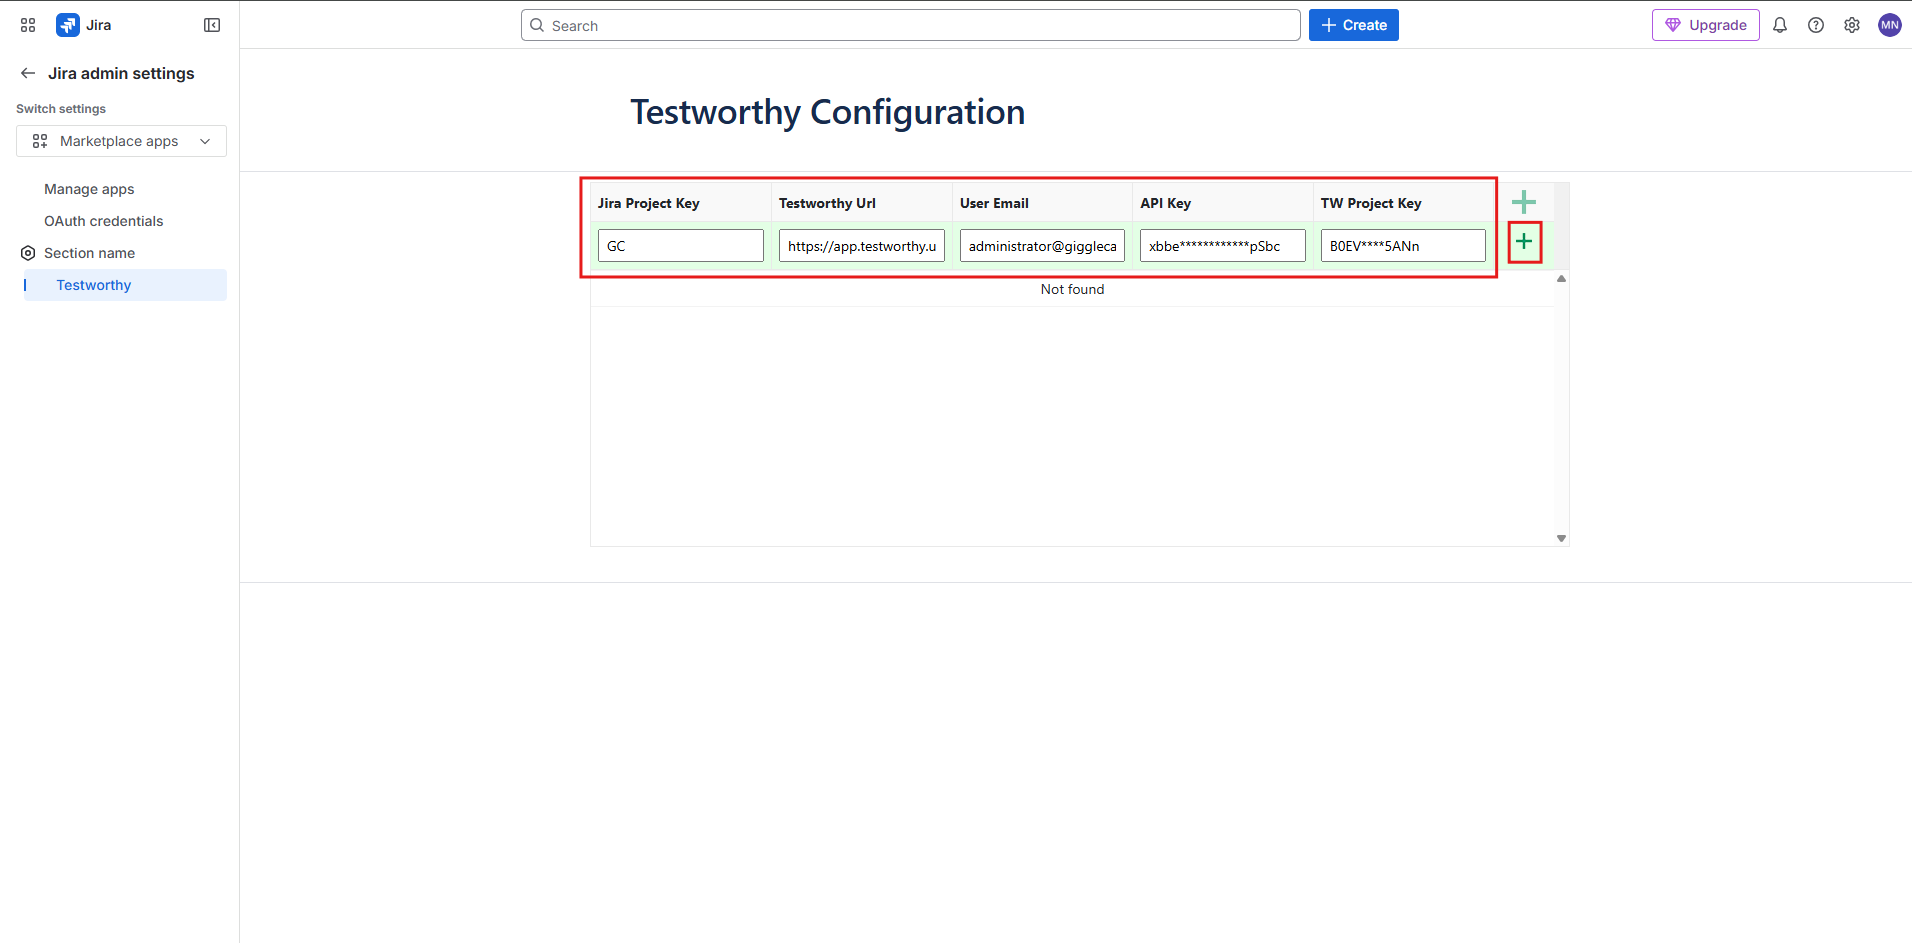
Once configured, all linked test cases to a specific Jira Ticket will appear in the Testworthy tab.
Personal vs Project Configuration
Project Configuration (Default)
- Scope: Applies to all team members in the project
- Managed By: Platform Admins, Tenant Owners, or Project Managers
- Use Case: Centralized management, consistent attribution
- Attribution: Issues created using the configured project account
Personal Override
- Scope: Applies only to the individual user
- Managed By: Individual users
- Use Case: Personal attribution, custom credentials
- Attribution: Issues created using the user's personal account
When to Use Each Approach
Use Project Configuration When:
- You want centralized management
- All team members should use the same Jira account
- You need consistent issue attribution
- You want simplified setup for team members
Use Personal Override When:
- You need personal attribution for Jira issues
- Team members have different Jira accounts
- You want individual accountability
- Different team members need access to different Jira projects
Troubleshooting
Common Connection Issues
"Connection Failed" Error
- Cause: Invalid credentials or network issues
- Solution:
- Verify your Jira URL format (include https://)
- Ensure your email and API token are correct
- Check if your Jira instance is accessible
- Verify API token permissions
"Authentication Failed" Error
- Cause: Incorrect email or API token
- Solution:
- Regenerate your API token from Atlassian
- Ensure you're using the correct email address
- Check if the API token has expired
"Permission Denied" Error
- Cause: Insufficient permissions in Jira
- Solution:
- Ensure you have project permissions in Jira
- Verify your account has issue creation rights
- Check if the project exists and is accessible
API Key Issues
"API Key Invalid" Error
- Cause: Expired or incorrect API key
- Solution:
- Regenerate the API key in Testworthy
- Update the key in your Jira plugin configuration
- Ensure you're using the correct key type (organization vs project)
"Access Denied" Error
- Cause: Insufficient permissions for API key generation
- Solution:
- Ensure you have the correct role (Platform Admin, Tenant Owner, or Project Manager)
- Contact your administrator for permission elevation
Status Sync Issues
"Statuses Not Updating" Error
- Cause: Network connectivity or configuration issues
- Solution:
- Check your internet connection
- Verify the Jira instance is accessible
- Re-save your connection configuration
- Use the manual refresh button in Linked Issues
Security Considerations
API Token Security
- Encryption: All API tokens are encrypted with AES-256 before storage
- Visibility: Tokens are never displayed in plain text in the interface
- Rotation: Regularly rotate your API tokens
- Scope: Use project-specific keys when possible for limited scope
Access Control
- Role-Based: Only users with appropriate roles can configure integrations
- Audit Trail: All configuration changes are logged
- Personal Overrides: Users can only configure personal overrides, not project settings
Network Security
- HTTPS Only: All connections use encrypted HTTPS
- Token Transmission: API tokens are never transmitted in URLs
- Secure Headers: All requests include appropriate security headers
Best Practices
- Regular Key Rotation: Rotate API keys every 90 days
- Least Privilege: Use project-specific keys when possible
- Monitor Usage: Regular review API key usage patterns
- Secure Storage: Store backup keys in secure password managers
- Team Training: Ensure team members understand security practices
Support and Resources
Documentation Links
Getting Help
- Check the Troubleshooting section above
- Contact your system administrator
- Review Jira and Testworthy logs for detailed error messages
- Ensure all prerequisites are met before configuration
Common Support Scenarios
- Setting up first-time integration
- Migrating from manual to automated linking
- Configuring team-wide vs personal authentication
- Troubleshooting connectivity issues
- Managing API key lifecycle
This guide covers the comprehensive setup and usage of Testworthy's Jira integration. For the latest updates and additional features, please refer to the in-application help or contact your administrator.